Database Design with Dia
In this post I'm going to give a quick how-to on creating database schemas with a wonderful tool called Dia. I've often found having a nice visual representation of a database to be quite helpful but can't stand keeping it up to date. As soon as you add a new column or change the design around you end up having to sync your visual diagram with your SQL files. It's tedious having to manage the various SQL for building the database and this can be a larger pain when trying to support different database platforms each with their own SQL syntax. So before you create your next database read on and see how Dia can make your life a bit easier.
Dia is a program for creating diagrams and for this exercise we'll be creating UML diagrams from within Dia. We're also going to use a perl script called tedia2sql which will transform our Dia files directly to SQL for our target database. What's also nice about creating database schemas this way is that you can generate SQL for multiple target databases without the maintenance overhead.
First off, install a copy of Dia as well as tedia2sql. You can download tedia2sql here and download Dia here. I'm not going to cover the install in this post but there should be packages available for most Linux distro's and if your not running Linux now is a great time to start!
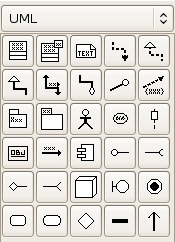
Fire up Dia, create a new diagram and save it as “employee.dia”. Select the UML sheet from the drop down list. We'll be using various UML objects to represent tables and definitions that make up our database. Here's a quick overview of the main UML objects and their usage:
| UML object | Description |
|---|---|
 |
Class represents a table in the database. A Class has a name which corresponds to the name of the table and attributes which map to the columns of the table. Attributes in classes can have visibility (public, private, protected). Protected attributes are primary keys. More on classes later. |
 |
Component is a special object that lets you define a list of default values to be inserted into a table. These are equivalent to hard coding “insert into ..” statements in your SQL files. |
 |
Small Package represents a typemap. Typemaps are used for adding custom SQL types such as MySQL tinyint. |
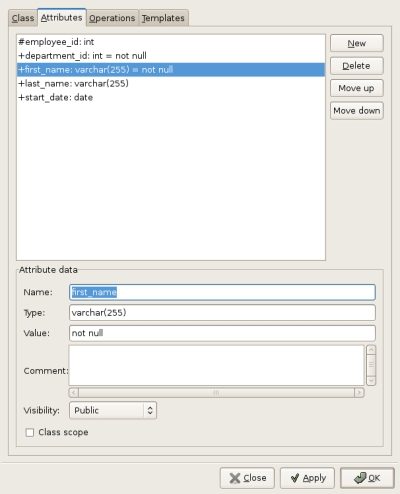
Now lets create our first table. Select the “Class” object icon from the UML sheet and click inside the diagram editor window. This will add the class to your diagram. Now right click on the new class and select “Show Properties”. This will bring up a rather large and complex property window for the UML class you've just created. We're only going to customize a few properties outlined below.
First, under the “Class” tab enter the name of the table (employee) in the “Class Name: " field. Next click on the “Attributes” tab and enter in the columns of the table as attributes. In the “Name: " field enter in the column name. In the “Type: " field enter in the SQL type for the column. If you want to support multiple database platforms try to be generic here and only use ANSI SQL 1992 or else use a typemap. More on typemaps later. In the “Value: " field enter any default values for the column. For example, this is where you could add in “not null”. If the column your adding is a primary key then don't put “not null” here and instead select “Protected” for the “Visibility: " field. Not null will automatically get added to all primary keys on output generation. The screen shot below is an example of the Class property editor window.
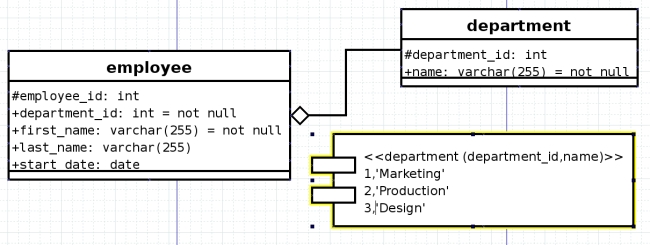
Next, repeat the process for as many tables as you need in your database. For this example, create two tables “employee” and “department” with the columns as shown in the screenshot below (note the ‘#’ in front of an attribute indicates that it's visibility is “Protected” thus making it a Primary Key):
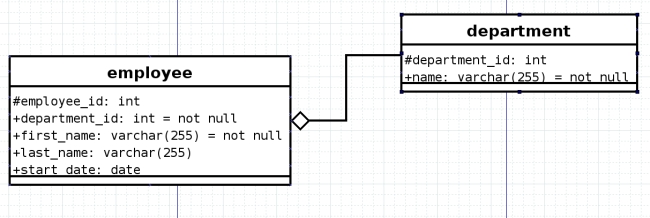
This is a simple example of a database which stores employee data along with the department they belong to. Now suppose we have a default list of departments that we'd like to load into the department table when our database is created. To do this we'll use the “Component” object from the UML sheet. Select the “Component” object and add it to your diagram editor window. Right click and select “Properties”.
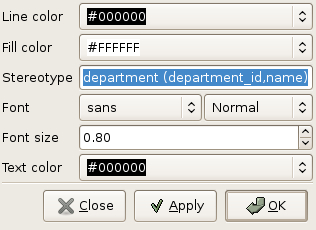
In the “Stereotype: " field you basically enter in the first part of an “insert into ..” SQL statement. For this example, to insert a default list of departments we'd normally write the following SQL:
insert into department (department_id, name) values (1, 'Marketing');
insert into department (department_id, name) values (2, 'Production');
insert into department (department_id, name) values (3, 'Design');
So in this case, for the “Stereotype: " field we'd enter in “department (department_id, name)". Click OK to close the properties dialog. Now in the Component object box enter in the values you'd like to insert, one per line. Here's what our diagram should look like now:
Now lets add in a typemap. Typemaps are used for when you'd like to configure custom types which are specific to a database platform. A good example of this is MySQL auto_increment. This is a feature specific to MySQL and not supported in all databases. Lets suppose we'd like to have a primary key column which gets auto incremented upon each insert. But we also want to support both MySQL and Apache Derby without having to maintain separate SQL files. To achieve this we'll create a custom typemap and define the specific SQL for each target db.
Typemaps are created using a Small Package so select the “Small Package” object and add it to your diagram editor window. Right click and select “Properties”.
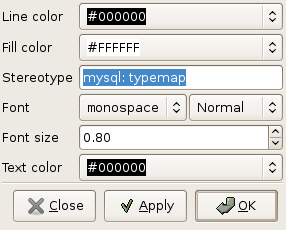
In the “Stereotype: " field you enter in the target database. So for example “mysql: typemap”. For a list of supported target databases see tedia2sql –help. Some common ones are: postgres, mysql, sybase, oracle, db2, and innodb. Click OK to close the properties dialog. Now inside the Small package box you can enter custom types one per line. For this example we'll create a custom type with a name of “identity”. This means that when we generate our SQL files, tedia2sql will replace the column type with our custom type. Here's a few examples:
| MySQL typemaps | Apache Derby typemaps |
|---|---|
identity: int unsigned auto_increment |
identity: int generated by default as identity |
bigid: bigint unsigned auto_increment |
bigid: long generated by default as identity |
Repeat the process for Apache Derby using “db2: typemap”. Now that we've defined our custom identity typemap we can change the employee_id column from type “int” to type “identity”. We can also do the same for our department table. Now these columns will be auto incrementing columns and depending on which target database we select on output the correct SQL will be generated. Our diagram should now look like this:
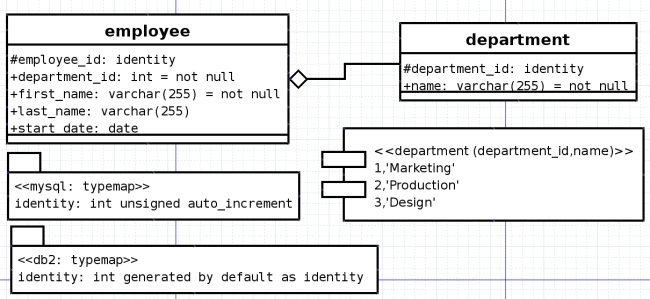
At this point we have created our database schema and defined a default list of departments to be inserted. We also created a typemap called “identity” which defines auto incrementing columns for both MySQL and Apache derby. Now lets generate the SQL files to create the database using tedia2sql. Before we run tedia2sql we need to apply a small patch to the tedia2sql script. This fixes a very small formatting issue in tedia2sql related to the typemaps we created. Edit the tedia2sql script (/usr/bin/tedia2sql) and comment out the line inside the parseTypeMap(..) subroutine that looks like this:
$defStr =~ s/s//g; # ignore spaces
     -- change to --
#   $defStr =~ s/s//g; # ignore spaces
or just apply the patch I created here (works for version 1.2.12):
$ patch /usr/bin/tedia2sql < tedia2sql-typemap-1.2.12.patch
Now we can generate the SQL files for our target databases:
$ tedia2sql -i employee.dia -o employee-mysql.sql -t mysql -d
$ tedia2sql -i employee.dia -o employee-derby.sql -t db2 -d
This will generate two SQL files for building the database in both MySQL and Apache derby. If you view these files you can see how tedia2sql handled our typemaps for the auto incrementing columns in each target database:
MySQL
-- employee
create table employee (
  employee_id                int unsigned auto_increment not null,
  department_id             int not null,
  first_name                varchar(255) not null,
  last_name                 varchar(255),
  start_date                date,
  constraint pk_Employee primary key (employee_id)
) ;
Apache Derby
-- employee
create table employee (
  employee_id                int generated by default as identity  not null,
  department_id             int not null,
  first_name                varchar(255) not null,
  last_name                 varchar(255),
  start_date                date,
  constraint pk_Employee primary key (employee_id)
) ;
You can download the files generated as well as the employee.dia file I used in this tutorial here:
You can test the SQL files generated by tedia2sql and create the employee database as follows:
MySQL
$ mysql -u user -p dbname < employee-mysql.sql
Apache Derby
$ java -cp derby.jar:derbytools.jar \
       -Dderby.system.home=/path/to/dbroot \
       -Dij.protocol=jdbc:derby: \
       -Dij.database='employee;create=true'
    org.apache.derby.tools.ij employee-derby.sql
A quick Makefile will help out a lot in testing out your database schema:
all:
      tedia2sql -i employee.dia -o employee-mysql.sql -t mysql -d
      tedia2sql -i employee.dia -o employee-derby.sql -t db2 -d
clean:
      rm -f *.sql
I've found that for small to moderate size projects creating database schemas in Dia and using tedia2sql for SQL generation to be a lifesaver. You can also make use of Dia's export feature to export your database schema to a number of different formats such as jpg, png, eps, tiff, etc. I really only scratched the surface of what can be done using these great tools. tedia2sql has support for lots of cool features like indexes, foreign key constraints, views and much more. For more information check out using tedia2sql and Dia's manual.
Happy Diagramming!